Skip to Content
MONDAY

All locations are open today from 9 a.m. to 9 p.m.

TUESDAY

All locations are open today from 9 a.m. to 9 p.m.

WEDNESDAY

All locations are open today from 9 a.m. to 9 p.m.

THURSDAY

All locations are open today from 9 a.m. to 9 p.m.

FRIDAY

All locations are open today from 9 a.m. to 5:30 p.m.

SATURDAY

All locations are open today from 9 a.m. to 5:30 p.m.

SUNDAY

Central Library is open 1 p.m. to 5 p.m. All other locations are closed today.

A

Use our step-by-step guides to create fun crafts and do-it-yourself projects at home.

Be sure to check back regularly for new craft projects!


DIY Watermelon Blanket

Hello friends! The sun is shining on spring flowers and the sky is blue.

I want to share a super fun and easy craft project that you could make with your family, or maybe you could set up a zoom crafting party with some friends! Let's make our very own watermelon towels!!

I found this amazing idea for making your own watermelon towel at www.havingfunathome.com.

Image of a towel dyed red and green to look like a watermelon

What I love about this project is that it's easy, it's fast, and it's practical. So, wait for a sunny day and grab a white beach towel. Make sure your towel is cotton or a natural fiber to take the dye. You can find inexpensive towels at some dollar stores and then you just need a few supplies. I used some hot water dyes, but you can also use cold water and two colours. Pink or red and green. I used a permanent marker and when the towel was finished being dyed, drew on the black seeds.

Mix up two batches of dye, then tie your towel with elastics about ⅔ of the way down and near the end. Wear some plastic gloves so you don't get red or green hands! Dip the large untied end in the red and squeeze out the extra liquid. Then dip the other end in the green. Once it has dried you can draw on the seeds. For exact instructions and pictures, visit www.havingfunathome.com.

If you don't enjoy messy art, you can grab a permanent marker and find some rocks and doodle easy patterns on them. Sit outside, enjoy the sun and find a way to play, explore and create. It's even more fun with your family or a friend. You don't have to be a great artist to create something just for the fun of making art!

Why this is important is being creative makes you feel better. Making art lets you express yourself and find a different way to share your unique self. It's easy and so much fun. Give it a try!

Messy Art: Bubble Paper

Now that the weather is improving a lot in our area and we can move messy art activities outside for much easier cleanup, it seems like a good time to write about a messy art activity like bubble paper!

Bubble paper mixes art with the pure joy of blowing bubbles in your drink with a straw, and it makes for a simple and beautiful piece of art that you can frame as is or use as paper to make a beautiful card or letter for a friend! 

Paper dyed in a green pattern using bubbles

Supplies

  • A small drinking glass and a straw 
  • Water 
  • Dish soap 
  • Food colouring 
  • White or light-coloured paper (I recommend a sturdier paper, like watercolour paper or cardstock for less warping, but any paper will do!) 

Instructions

  1. Fill your glass with water about two-thirds full, then add some dish soap. 
  2. Add the food colouring of your choice. The more you add, the bolder the colours will show up on your paper. 
  3. Now the fun part: blow bubbles in your soapy coloured water with your straw!
    WARNING: Do NOT drink the water!! It tastes YUCKY!
  4. Once they reach over the top of the glass, swipe your paper over top of the bubbles so that some bubbles stick to the paper. 
  5. As the bubbles pop, they’ll leave interesting patterns of colour on the paper. 
  6. Repeat Step 3 as many times as you need to get your desired effect, waiting a few minutes in between to give the bubbles a chance to pop and the paper time to dry. If you’re using a lightweight paper, you may need to wait a little longer between bubbles. 

I did this activity in my Art Club and one participant had the great idea of adding a little food colouring on top of the bubbles after you’ve blown them. This can speed up the process for the impatient ones among us. Here’s a shot of the finished product. I plan to write a nice letter to a friend on this one, and maybe even draw a couple of butterflies on there! 

Crafty Magic Tricks

Magic tricks are pretty cool, but a magic trick that is also a craft is a great boredom buster, and we can never have enough of those for our kids. Here is a simple crafty magic trick that you can make with your children to keep them occupied for a good afternoon. I learned how to make this in grade school, but was reminded of it by Maggy from Red Ted Art. She has a short video on how to do this craft on her website, so check it out if you get stuck.

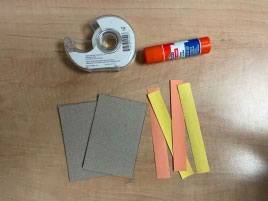
For this craft, you will need:

  • Cardboard from a box of cereal or crackers 
  • Construction paper 
  • Scissors 
  • Glue or tape 

Cut your cereal box cardboard into two identical rectangles a little bigger than a credit card, at least 10cm by 7cm (the size doesn’t matter too much as long as they are the same size). Cut four strips of paper, about 1cm wide and 12cm long (or a few centimetres longer than the short side of your rectangles).

Photo showing two rectangles and four strips of paper.

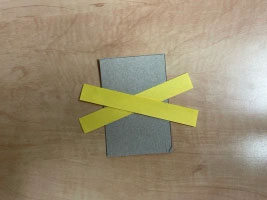
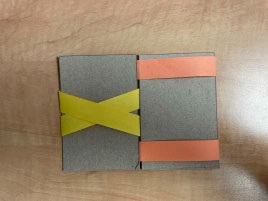
Arrange two paper strips on one piece of cardboard so they make an X in the centre. 

Photo showing how to arrange the paper strips on the first rectangle

Fold the edges on the left side and glue them down on the back of the cardboard.

Photo showing the second rectangle connected to the first

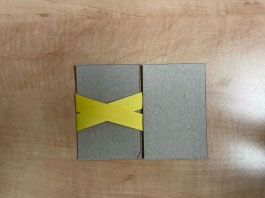
Glue the right-side edges on the back of the second piece of cardboard. Both pieces of cardboard should be connected now!

Photo showing how the rectangles are connected on the reverse side

Arrange the other two strips of paper along the top and bottom edges of the second piece of cardboard. You want to make sure they don’t overlap with the X on the first cardboard. 

Photo showing how to arrange the remaining two strips of paper

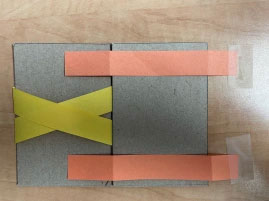
Fold the edges on the left side and glue them to the back. 

Photo showing how to fold the remaining two strips of paper

 Slip the right-side edges between the two pieces of cardboard, and glue them to the back of the first cardboard.

Photo showing how the paper strips are attached on the reverse side

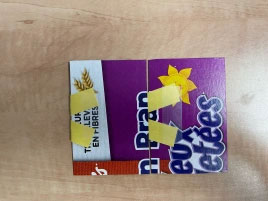
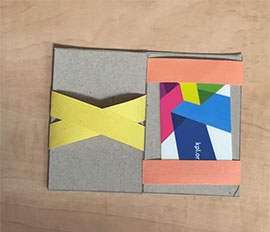
You now have a functioning magic wallet with hinges on both sides, but you can always decorate it however you like at this point. I like to cover the back sides of the cardboard with paper so you can’t see where I glued down the flaps.

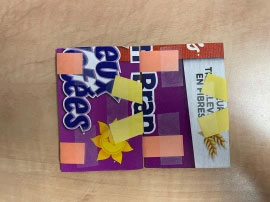
To see your magic wallet in action, slide your library card (or any card!) underneath the two strips. Close the wallet and open it on the other side. Ta-da! Now your library card is underneath the X! 

Photo showing the completed project

This is a perfect craft for a person who fidgets, as it is very satisfying to repeatedly flip open on either side once completed.